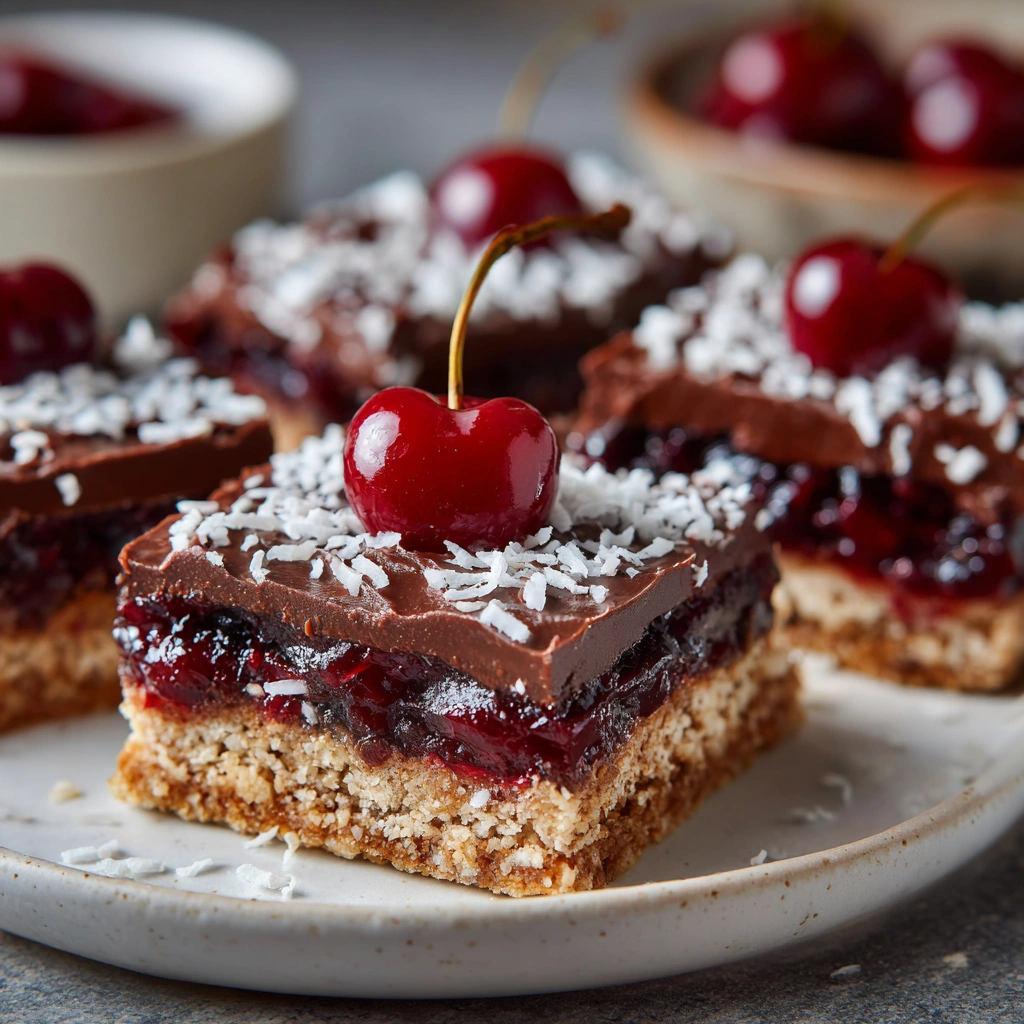
Introduction to Classic Cherry Ripe Slice
As a busy mom, I know how precious time can be, especially when it comes to whipping up something sweet. That’s why I absolutely adore this Classic Cherry Ripe Slice! It’s a no-bake dessert that combines the rich flavors of chocolate and coconut with a delightful cherry filling. Perfect for those hectic days when you want to impress your loved ones without spending hours in the kitchen. Trust me, this treat will have everyone asking for seconds, and you’ll love how easy it is to make!
Why You’ll Love This Classic Cherry Ripe Slice
This Classic Cherry Ripe Slice is a dream come true for busy moms and professionals alike. It’s incredibly easy to make, requiring no baking at all! In just 20 minutes of prep time, you can create a dessert that’s not only delicious but also visually stunning. The combination of chocolate, coconut, and cherries is simply irresistible, making it a crowd-pleaser for family gatherings or a sweet treat after a long day.
Ingredients for Classic Cherry Ripe Slice
Gathering the right ingredients is the first step to creating this delightful Classic Cherry Ripe Slice. Here’s what you’ll need:
- Digestive biscuits: These provide a crunchy base. You can substitute with graham crackers if needed.
- Desiccated coconut: This adds a tropical flavor and chewy texture. Unsweetened coconut works too if you prefer less sweetness.
- Sweetened condensed milk: This is the magic ingredient that binds everything together, giving it a creamy consistency. You can use evaporated milk for a lighter version.
- Cherries: Fresh, pitted, and chopped cherries bring a burst of flavor. Frozen cherries can be used in a pinch, just thaw and drain them first.
- Dark chocolate: Melted chocolate forms a luscious topping. Opt for high-quality chocolate for a richer taste, or use milk chocolate if you prefer a sweeter finish.
For exact measurements, check the bottom of the article where you can find everything listed for easy printing. Happy cooking!
How to Make Classic Cherry Ripe Slice
Now that you have all your ingredients ready, let’s dive into making this delightful Classic Cherry Ripe Slice. Follow these simple steps, and you’ll have a stunning dessert that’s sure to impress!
Step 1: Prepare the Biscuit Base
Start by crushing the digestive biscuits into fine crumbs. You can use a food processor for this, or simply place them in a ziplock bag and crush them with a rolling pin. It’s a great way to relieve stress, too!
Once you have your crumbs, mix them in a bowl with the desiccated coconut and sweetened condensed milk. Stir until everything is well combined. The mixture should be sticky and hold together when pressed.
Step 2: Form the Base Layer
Next, take a lined baking tray and press the biscuit mixture firmly into the bottom. Use the back of a spoon or your hands to create an even layer. Make sure it’s compact; this will help your slice hold its shape later.
Don’t worry if it gets a little messy; that’s part of the fun! Just remember, the more you press, the better it will set.
Step 3: Add the Cherry Layer
Now it’s time for the star of the show: the cherries! Spread the chopped cherries evenly over the biscuit base. Their vibrant color and juicy flavor will add a lovely contrast to the rich chocolate.
Feel free to get creative here! You can arrange them in a pattern or just scatter them for a more casual look. Either way, they’ll taste amazing!
Step 4: Top with Chocolate
With the cherries in place, it’s time to pour the melted dark chocolate over the top. Make sure the chocolate is smooth and slightly cooled, so it doesn’t melt the cherries.
Use a spatula to spread the chocolate evenly, covering all the cherries. This layer adds a decadent finish to your Classic Cherry Ripe Slice, making it irresistible!
Step 5: Chill and Set
Finally, pop the tray into the refrigerator and let it chill for at least 2 hours. This step is crucial for the slice to set properly. While you wait, you can daydream about how delicious it will be!
Once it’s set, take it out and cut it into slices. Serve chilled, and watch as everyone enjoys this delightful treat!
Tips for Success
- Use a sharp knife to cut the slices for clean edges.
- Let the chocolate cool slightly before pouring to avoid melting the cherries.
- For a fun twist, add a sprinkle of sea salt on top of the chocolate.
- Make sure to press the biscuit base firmly for a sturdy slice.
- Experiment with different fruits like raspberries or strawberries for variety!
Equipment Needed
- Baking tray: A square or rectangular tray works best. You can also use a glass dish if that’s what you have on hand.
- Mixing bowl: Any large bowl will do. A sturdy plastic or glass bowl is perfect for mixing.
- Food processor or rolling pin: Use a food processor for quick biscuit crushing, or a rolling pin for a more hands-on approach.
- Spatula: A silicone spatula is great for spreading the chocolate evenly.
Variations of Classic Cherry Ripe Slice
- Nutty Delight: Add chopped nuts like almonds or walnuts to the biscuit base for an extra crunch.
- Fruit Fusion: Swap out cherries for other fruits like raspberries, strawberries, or even dried cranberries for a different flavor profile.
- Vegan Version: Use vegan chocolate and substitute sweetened condensed milk with coconut cream for a plant-based treat.
- Gluten-Free Option: Replace digestive biscuits with gluten-free cookies or almond flour for a gluten-free version.
- Minty Fresh: Add a few drops of peppermint extract to the chocolate for a refreshing minty twist.
Serving Suggestions for Classic Cherry Ripe Slice
- Pair with a scoop of vanilla ice cream for a delightful contrast.
- Serve alongside fresh berries for a pop of color and flavor.
- Drizzle with extra melted chocolate for an indulgent touch.
- Garnish with mint leaves for a refreshing finish.
- Enjoy with a cup of coffee or tea for a cozy treat.
FAQs about Classic Cherry Ripe Slice
Can I make Classic Cherry Ripe Slice ahead of time?
Absolutely! This no-bake dessert is perfect for making a day in advance. Just store it in the refrigerator, and it will be ready to serve when you need it.
What can I substitute for cherries?
If cherries aren’t your thing, feel free to swap them out for other fruits. Raspberries, strawberries, or even dried cranberries work beautifully in this Classic Cherry Ripe Slice.
How should I store leftovers?
Store any leftover slices in an airtight container in the refrigerator. They’ll stay fresh for up to a week, but I doubt they’ll last that long!
Can I freeze Classic Cherry Ripe Slice?
Yes, you can freeze it! Just wrap the slices tightly in plastic wrap and place them in a freezer-safe container. They’ll keep for about a month. Thaw in the fridge before serving.
What’s the best way to cut the slices?
For clean edges, use a sharp knife and wipe it with a damp cloth between cuts. This will help you achieve those perfect, Instagram-worthy slices!
Final Thoughts
Making this Classic Cherry Ripe Slice is more than just preparing a dessert; it’s about creating sweet memories with your loved ones. The joy of seeing their faces light up as they take that first bite is priceless. This no-bake treat is a lifesaver for busy days, allowing you to indulge in something delicious without the fuss. Plus, it’s versatile enough to adapt to your family’s tastes. So, gather your ingredients, roll up your sleeves, and let the magic happen in your kitchen. Trust me, this slice will become a cherished favorite in no time!
Print
Classic Cherry Ripe Slice: Discover the Ultimate Recipe!
- Prep Time: 20 minutes
- Cook Time: 0 minutes
- Total Time: 2 hours 20 minutes
- Yield: 12 slices 1x
- Category: Dessert
- Method: No-bake
- Cuisine: Australian
- Diet: Vegetarian
Description
A delicious no-bake dessert featuring a chocolate and coconut base, layered with a cherry filling and topped with chocolate.
Ingredients
- 200g digestive biscuits
- 100g desiccated coconut
- 150g sweetened condensed milk
- 200g cherries, pitted and chopped
- 200g dark chocolate, melted
Instructions
- Crush the digestive biscuits into fine crumbs.
- In a bowl, mix the biscuit crumbs, desiccated coconut, and sweetened condensed milk until well combined.
- Press the mixture into the base of a lined baking tray to form an even layer.
- Spread the chopped cherries over the biscuit base.
- Pour the melted dark chocolate over the cherries, spreading it evenly.
- Refrigerate for at least 2 hours or until set.
- Cut into slices and serve chilled.
Notes
- For a richer flavor, use high-quality dark chocolate.
- Store leftovers in an airtight container in the refrigerator.
- Can be made a day in advance for convenience.
Nutrition
- Serving Size: 1 slice
- Calories: 250
- Sugar: 15g
- Sodium: 50mg
- Fat: 12g
- Saturated Fat: 7g
- Unsaturated Fat: 3g
- Trans Fat: 0g
- Carbohydrates: 35g
- Fiber: 2g
- Protein: 3g
- Cholesterol: 5mg