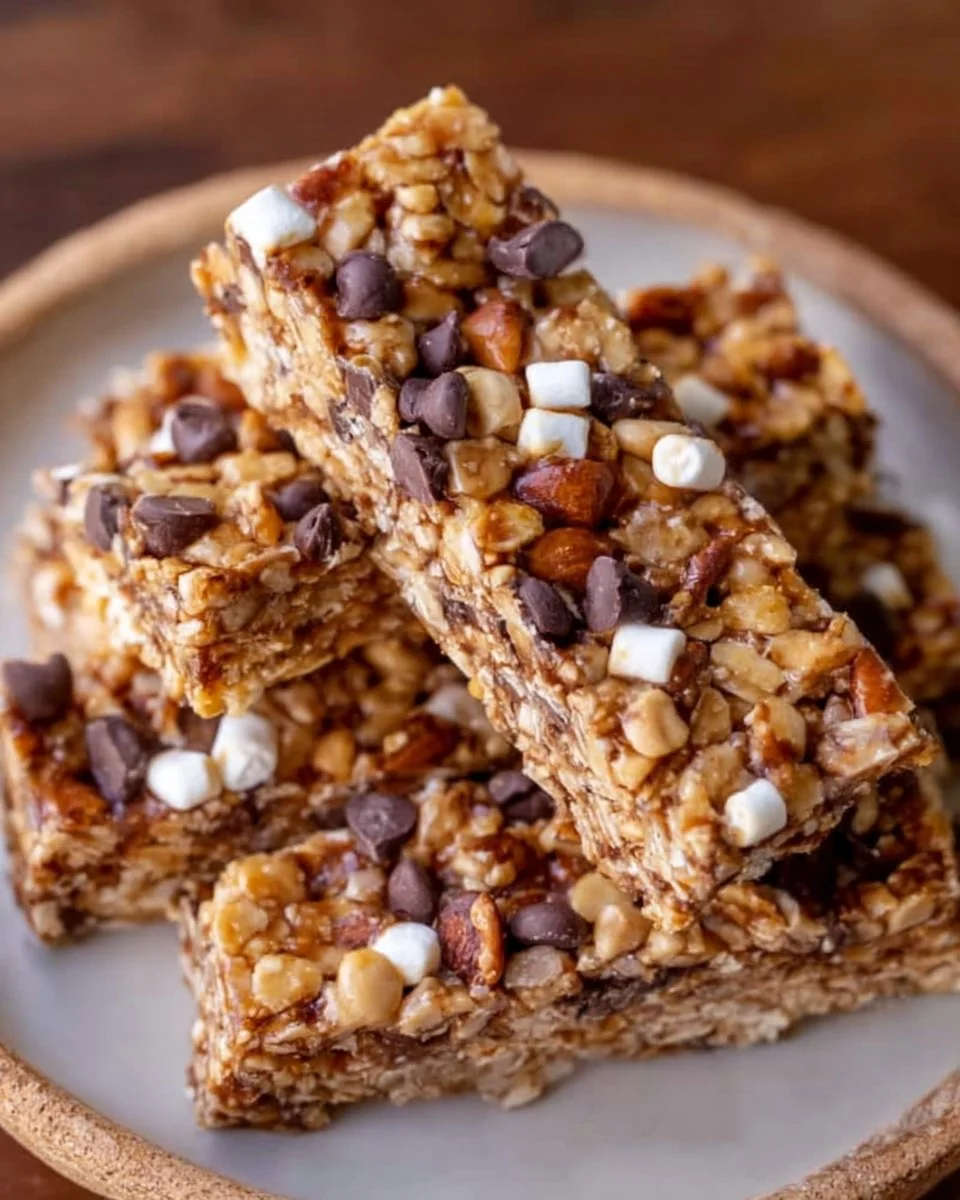
There’s nothing quite like the feeling of cradling a homemade granola bar in your hands, the aroma of toasted oats and warm honey wrapping around you like a cozy blanket. Each bar, a handcrafted treasure, invites you to take a bite, revealing a delightful crunch that sends a symphony of flavors dancing across your palate. Imagine the sweet creaminess of nut butter mingling with rich chocolate, while bursts of gooey mini marshmallows add an unexpected touch of whimsy—a moment of pure joy that’s perfectly portable, ready to accompany you on life’s adventures.
As you enjoy your first delightful bite, you’ll taste the delightful interplay of textures: the crunch of toasted nuts, the chewiness of oats, and the soft melt of chocolate chips. This is not just a snack; it’s a celebration of nature’s ingredients coming together to fuel your day. With every bite, you’ll feel the energy flooding in, making your taste buds sing and your heart soar, ready to tackle whatever challenges lie ahead.
Why You’ll Love This Homemade Granola Bars
These homemade granola bars stand out from the store-bought versions, bursting with wholesome goodness without any of the questionable additives. Crafted with love, they offer the perfect balance between health and indulgence. Each bite delivers a sweet, nutty flavor paired with tantalizing chocolate notes, creating a satisfying treat that’s as nutritious as it is delicious. Whether you’re gearing up for a busy day at work, packing a lunch for the kids, or simply enjoying a quiet moment with your favorite book, these bars provide the perfect companion.
Beyond their irresistible taste and textures, homemade granola bars allow you to customize your experience. Choose your favorite nuts, switch out the chocolate for dried fruit, or tweak the sweetness to your liking—each variation is a new adventure waiting to unfold. They’re incredibly versatile too—break them into pieces for an incredible topping on your morning yogurt, or crumble them over a scoop of ice cream for an exciting dessert. Perfect for breakfast, snacks, or a post-workout energy boost, these little treasures serve as your perfect ally in leading a vibrant lifestyle.
Preparation Phase & Tools to Use
Before embarking on your culinary adventure, gather a few essential tools to make the process seamless. Having the right equipment can elevate your granola bar-making experience!
- Large Mixing Bowl: A sturdy bowl allows you to thoroughly mix dry and wet ingredients without splashes and spills.
- Small Saucepan: This is essential for melting the nut butter and honey, creating a luscious, homogenous mixture that binds your bars.
- Spatula or Spoon: Choose a large, sturdy spatula or wooden spoon to easily combine your ingredients; this’ll help you avoid any lumps.
- 9×9-inch Baking Dish: A lined baking dish is crucial for setting your bars; it ensures they’ll release easily once cooled and compacted.
- Refrigerator: Don’t forget this essential appliance! It’ll help your granola bars firm up beautifully, making them easy to slice.
Preparation tips enhance your experience too. Make sure to line your baking dish with parchment paper for easy removal and cutting. This little tip saves you time and hassle in the end. Plus, while you’re at it, toast the nuts for an extra layer of flavor that will make each bite truly irresistible.
Ingredients for Homemade Granola Bars
- 2 cups rolled oats: These form the backbone of your granola bars, providing heartiness and chewiness. Feel free to use gluten-free oats if needed.
- 1 cup nuts (e.g., almonds, walnuts): Nuts offer a satisfying crunch and healthy fats. Experiment with different types for variety.
- 1/2 cup honey or maple syrup: This natural sweetener binds everything together while adding a delightful touch of sweetness. For a vegan option, go with pure maple syrup.
- 1/2 cup chocolate chips: A sprinkle of chocolate elevates the entire experience, but you can swap it for dried fruit if you prefer a more wholesome alternative.
- 1/2 cup mini marshmallows: These marshmallows add chewiness and a fun texture contrast; feel free to skip them if you’re not a fan.
- 1/2 cup nut butter (e.g., peanut butter, almond butter): This creamy addition provides richness and acts as a glue for holding all your ingredients together.
- 1/2 teaspoon vanilla extract: A splash of vanilla invites warmth into the mixture, enhancing every bite.
- Pinch of salt: This little touch brings out the natural flavors and balances the sweetness beautifully.
How to Make Homemade Granola Bars
- In a large bowl, combine the rolled oats, nuts, salt, and chocolate chips. Stir gently, ensuring the dry ingredients blend nicely.
- In a small saucepan over low heat, melt the honey (or maple syrup) and nut butter, stirring until they’re beautifully combined and smooth.
- Remove the saucepan from heat and stir in the vanilla extract, letting that warm aroma fill your kitchen.
- Pour the nut butter mixture over the oat mixture, and gently stir until every morsel is coated and well combined.
- Carefully fold in the mini marshmallows, ensuring they’re evenly distributed throughout the mixture.
- Transfer the mixture into the lined 9×9 inch pan, pressing it firmly with the spatula so it compacts well and holds together.
- Refrigerate the pan for at least 2 hours, or until the mixture sets and becomes firm enough to slice.
- Once set, remove the bars from the pan, cut them into your desired sizes, and get ready to savor each delicious bite!
Chef’s Notes & Helpful Tips
- Make-ahead tips: Prepare a batch in advance so you have homemade granola bars ready to go in the morning. They’ll stay fresh in the freezer for about three months.
- Baking alternatives: You can make these bars in the oven for a warm, toasted flavor. Spread everything out on a baking sheet, baking at 350°F (175°C) for 20-25 minutes, allowing them to cool and firm up before cutting.
- Customization ideas: Add dried fruits like cranberries or apricots for a chewy contrast; experiment with seeds, such as chia or flaxseeds, for added nutrition.
Common Mistakes to Avoid
- Not compacting the mixture: Failing to press the mixture firmly into the pan leads to crumbly bars. Make sure to use the back of a spatula or your hands to secure it.
- Using the wrong nuts: Be cautious of nuts that can burn easily; raw or lightly toasted options work best.
- Overheating: Melting the nut butter and honey too quickly might separate them; always use low heat and stir patiently.
What to Serve With Homemade Granola Bars
- Yogurt: Add crumbled granola bars to your morning yogurt for a delightful crunch and extra flavor.
- Fresh fruit: Pair with banana slices or berries to create a healthy, well-rounded breakfast.
- Nut milk: Serve alongside a glass of almond or oat milk for an energizing morning boost.
- Smoothies: Blend your favorite fruits and a granola bar for a quick on-the-go breakfast or snack.
- Ice cream: Crumble on top of your favorite ice cream for a decadent dessert.
- Honey or syrup: Drizzle some over your bars for an extra sweet touch.
Storage & Reheating Instructions
Store your homemade granola bars in an airtight container in the refrigerator for optimal freshness. They’ll last for up to two weeks—if they last that long! For longer storage, keep them in the freezer, where they’ll maintain their deliciousness for up to three months. When ready to indulge, just take out what you need, let them thaw briefly, and enjoy their delightful taste!
Estimated Nutrition Information
Approximate nutrition information per bar (assuming 12 bars):
- Calories: 150
- Protein: 4g
- Carbohydrates: 20g
- Fat: 7g
- Sugar: 6g
Note: Values may vary depending on specific ingredients and portion sizes used.
FAQs
1. Can I use other sweeteners instead of honey?
Absolutely! Maple syrup, agave nectar, or brown rice syrup work well, providing similar binding and sweetening properties.
2. How can I make these bars gluten-free?
Use certified gluten-free rolled oats and ensure that any added ingredients, like chocolate chips, are also gluten-free.
3. What other ingredients can I add?
Feel free to experiment with different seeds (chia, sunflower), nut butter flavors, or even spices like cinnamon or cocoa powder for variation.
4. Can I use nut-free butter?
Yes, you can substitute nut butter for sunflower seed butter or pumpkin seed butter if you have nut allergies!
5. How do I adjust the texture if my bars are too crumbly?
If your bars are too dry, add a bit more nut butter or sweetener to the mixture before pressing it into the pan.
As you prepare to embark on your homemade granola bar adventure, let the aroma of fresh ingredients inspire you. There’s something magical about crafting your snacks—each bar you create holds the promise of joyful moments, from a busy breakfast on-the-go to a tasty midday treat. So gather your tools, mix those wholesome ingredients, and enjoy every last bite. Your taste buds will thank you for it!
Print
Homemade Granola Bars
- Prep Time: 15 minutes
- Cook Time: 0 minutes
- Total Time: 120 minutes
- Yield: 12 servings 1x
- Category: Snack
- Method: No-Cook
- Cuisine: American
- Diet: Vegetarian
Description
Delicious homemade granola bars combining toasted oats, nuts, nut butter, and chocolate for a perfect snack.
Ingredients
- 2 cups rolled oats
- 1 cup nuts (e.g., almonds, walnuts)
- 1/2 cup honey or maple syrup
- 1/2 cup chocolate chips
- 1/2 cup mini marshmallows
- 1/2 cup nut butter (e.g., peanut butter, almond butter)
- 1/2 teaspoon vanilla extract
- Pinch of salt
Instructions
- Combine the rolled oats, nuts, salt, and chocolate chips in a large bowl.
- Melt the honey and nut butter over low heat in a small saucepan, stirring until smooth.
- Stir in the vanilla extract after removing the saucepan from heat.
- Pour the nut butter mixture over the oat mixture and stir until well combined.
- Fold in the mini marshmallows.
- Transfer the mixture into a lined 9×9 inch pan, pressing firmly.
- Refrigerate for at least 2 hours until firm.
- Slice into bars and enjoy!
Notes
Make-ahead tips: Store bars in an airtight container in the refrigerator for up to two weeks, or freeze for up to three months.
Nutrition
- Serving Size: 1 bar
- Calories: 150
- Sugar: 6g
- Sodium: 0mg
- Fat: 7g
- Saturated Fat: 1g
- Unsaturated Fat: 6g
- Trans Fat: 0g
- Carbohydrates: 20g
- Fiber: 2g
- Protein: 4g
- Cholesterol: 0mg